Conditional visibility
Now that you’ve learned about components, forms, and filters, let’s go over conditional visibility. This is a feature which lets you use filters to choose when your components, sections, or fields will be displayed on a user’s page. For example, you can set up your accounts page so that it looks different for business and private accounts. Let’s build these pages together. There are three different options of where you can set up conditional visibility: components, sections, and fields. Below you’ll see examples for each.
To start, you’ll need to open the page you’d like to edit, which in this case is the Accounts page. After clicking Edit Page to open the editor, you can now select the component, section, or field you’d like to edit. By clicking one of these options, you’ll open the Visibility section in the settings on the right. Here you can set up the relevant filter.
Component visibility
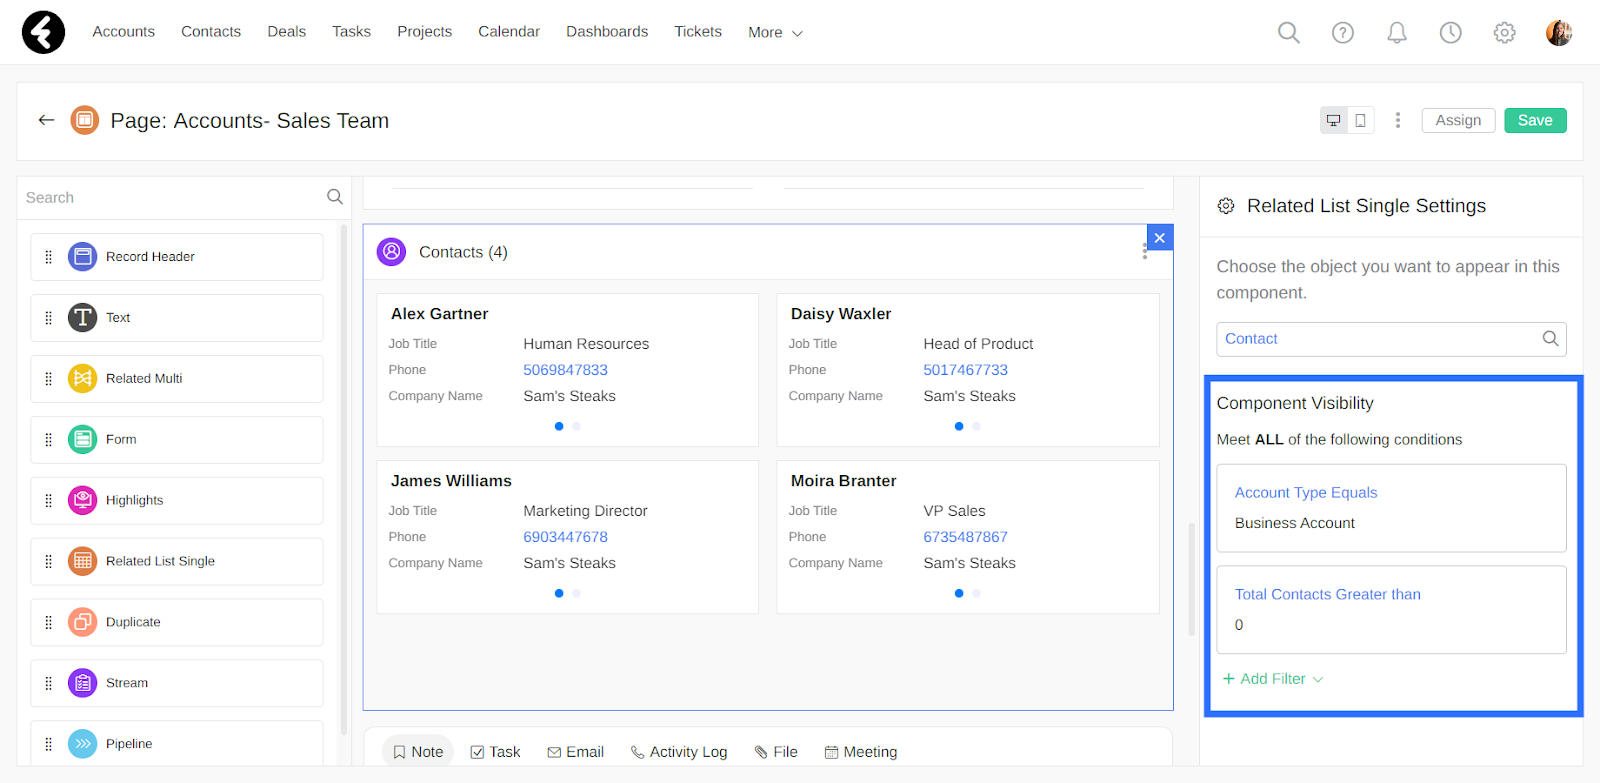
An example of a component we’d only like to display for our business accounts is the Related List Single component for the Contacts object. The private accounts that work with our company usually only provide us with one set of contact information, which we simply save to their account. On the other hand, our business accounts frequently have many different contacts who we need to be in touch with. For these accounts, it’s very useful to have this component displayed and automatically see an open list of all the related contacts for each account.

Let’s make sure that this component only displays for my business accounts by setting up its visibility settings. After selecting it, let’s go to the Component Visibility section and click + Add Filter. We can set the condition as Field: Account Type, Operator: Equals, and Value: Business Account and click Apply. Now the Contacts related single component will only be displayed for business accounts. We can even add an additional condition which checks if there’s at least one contact related to the current account, simply set the condition as Field: Total Contacts, Operator: Greater Than, and Value: 0. Now our component will only be displayed if it’s relevant to the current account.
Section Visibility
Let’s say that you want to display a billing section, but only for active accounts. You can do this easily using the section visibility. To start, create the billing section. Next, click on the section and use its section visibility settings. Click the + Add Filter button to define your condition. Start by setting the field to Status. This will base your filter on the status field.
Next, set the operator to Equals. The equals operator will now compare between the status field and the selected value. The value type is based on the type of the chosen field. Because status is a picklist field, you’ll have to choose one of these picklist options as the value. Choose the Active value to have your filter check if an account’s status equals active, and then click Apply.
Your billing section will now only appear once you set an accounts status to active. If you switch an accounts status back to new, the billing section will be hidden again.
Field Visibility
You can choose when you would like a field to be displayed using the field visibility section of the field settings. For example, you can create a Communicate via Email field which will only be displayed if the Email field is filled in. This way, you won’t have a request to communicate using emails if the account in question has not provided an email address.
To start, select the field which you would like to control the visibility of, in this case Communicate via Email. Click on the field within the relevant form to open the field visibility settings on the right of the page. Next click the Add Filter button to set your conditions. Start by selecting the Email field, which this filter will be based on. Then choose the Is not empty operator option and click Apply.
Now the communicate via email option will only be displayed for the accounts where the option is relevant, and your form will only include useful fields.
Apply filters to your page components to set exactly when each component will be displayed. You can even use conditional visibility for form sections and fields.
Course Lessons
Up next
