Object studio
You can use the object studio to manage all the objects, pages, and fields in your system. To access the object studio, first click the settings gear and then under the System tab select the Object Studio option. Here you’ll find a list view of all the objects in your system. This will include both built in and custom objects. You’ll learn about both below.
Editing objects
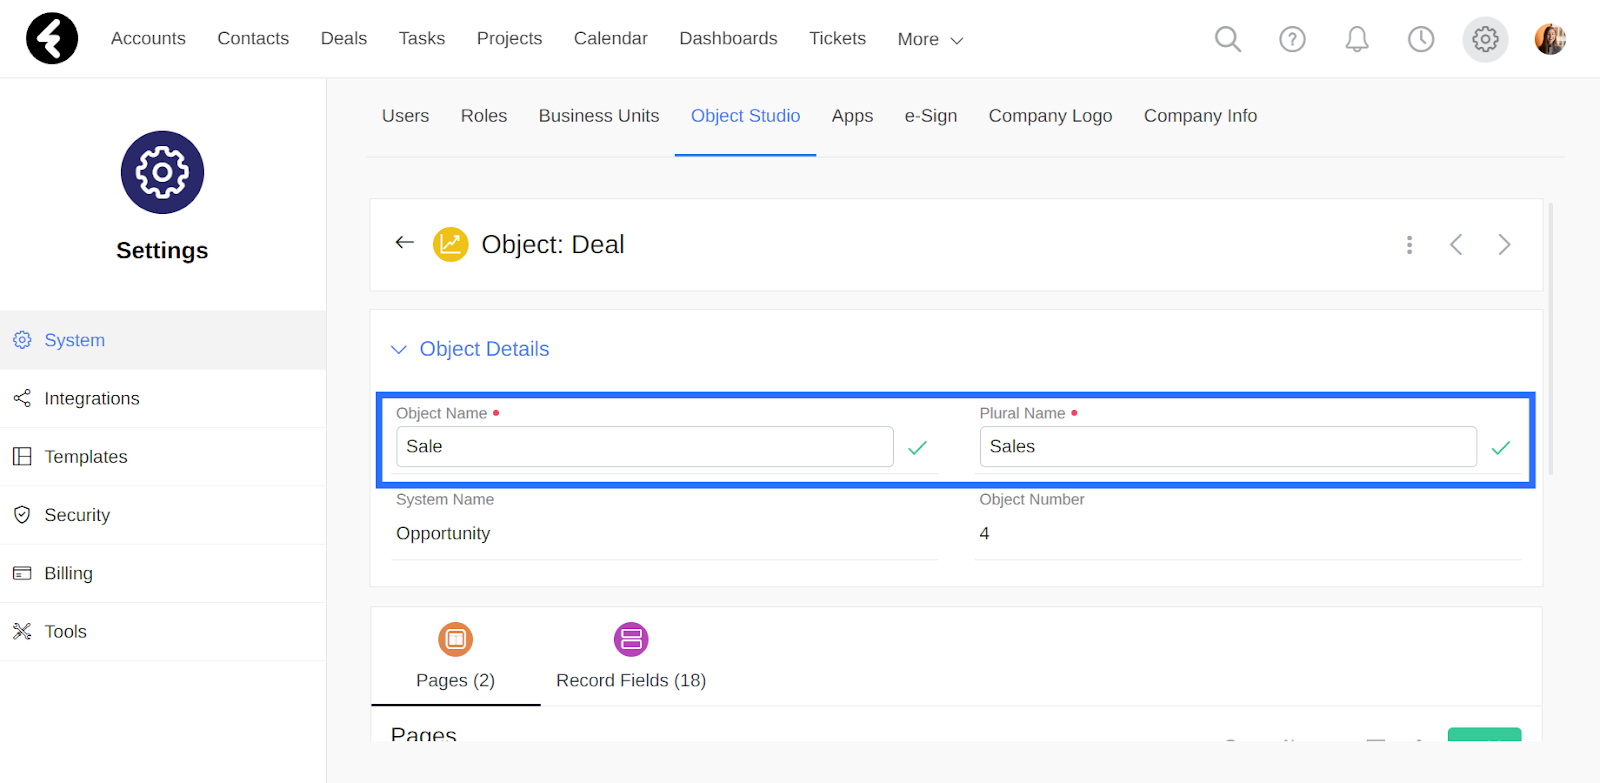
By clicking on a specific object’s record, you’ll open its page. At the top you’ll find a form with four built in fields. The System Name and Object Number fields are automatically set for all objects and cannot be changed. You can edit the Object Name and Plural Name fields, which are used throughout the system to display the object’s name. For example, you can open the Deal object’s page and switch its name so it's instead called “Sale”. In this way you can customize all the built in system objects. Under the form you’ll find the Pages and Record Fields options, which are explained in detail below.
Creating objects
In addition to the built in system objects, you can also create custom objects for your specific business. For example, if you run a storefront business, you may want to create a supplier object where you can store and manage all your suppliers. To start, click the Add button at the top right of the object studio. This will open a form where you can add the name and plural name of your new object and then click Save. Your new object will now be created.

In addition to the Created On, Created By, Modified On, and Modified By built in fields, each object will also have the following built in and read only fields. The values of these fields will be automatically set and cannot be changed.
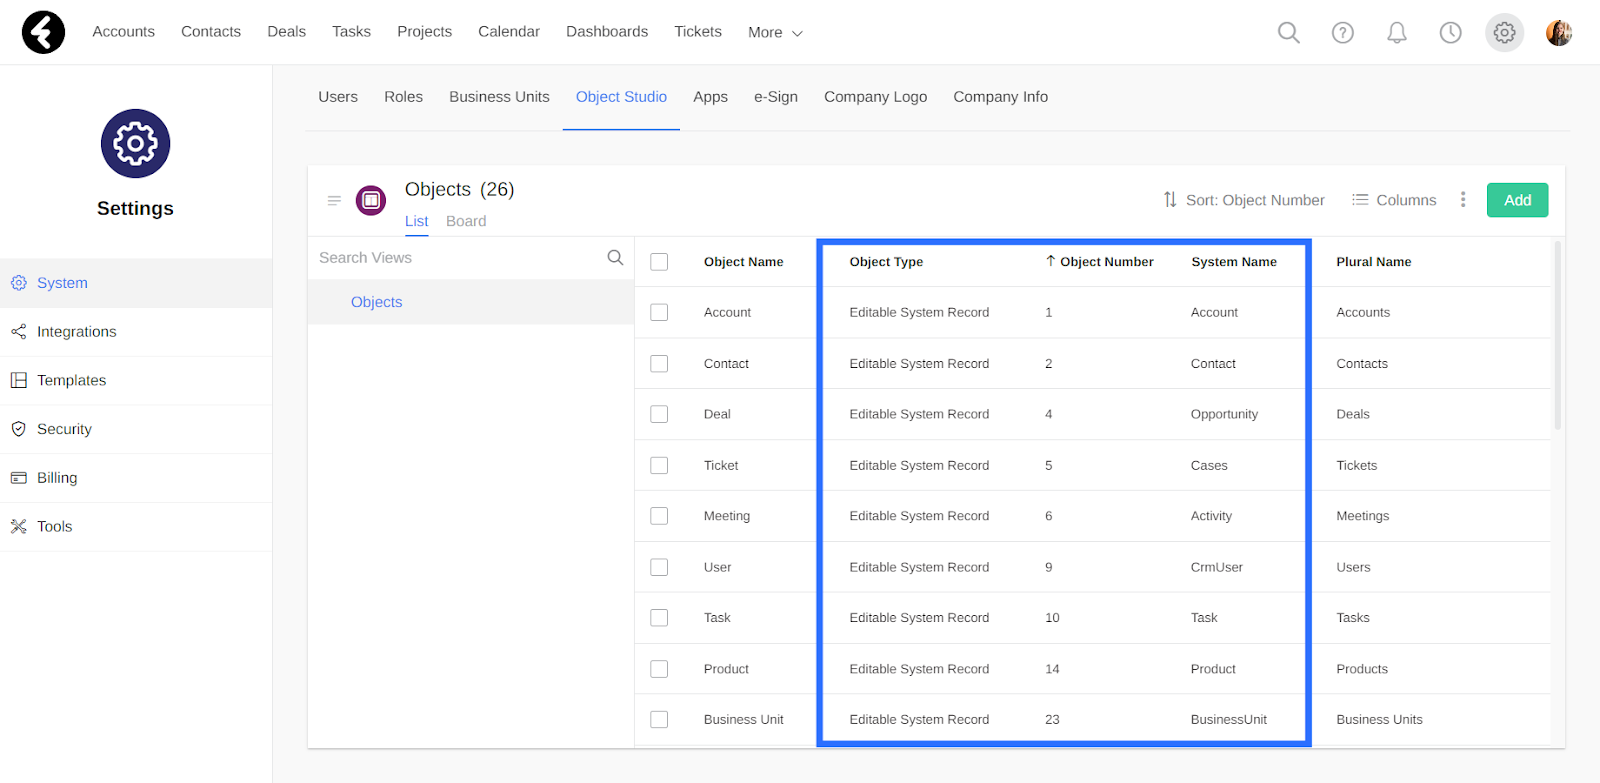
- System Name: This is the name of the object which is frequently used for developer purposes. For built in objects it will be relevant to the purpose of the object, while for custom objects it will simply be the phrase customobject followed by the number of the object, such as customobject1005.
- Object Number: This number is used to identify the object, and is also frequently used for developer purposes. Custom object’s numbers will always be 1,000 or higher.
- Object Type: This field will be set to Editable System Record for built in objects and User Record for custom objects. This field is visible in the main object studio views, but not in the individual object pages.
You can use any of these fields to identify if an object is a built in or custom object.
Deleting custom objects
You can choose to delete a custom object, which will delete all of the object’s fields and all of its records. To delete a custom object, first open the page of the object you’d like to remove from your system. Next open the three-dot menu, click Delete, type DELETE into the popup, and then click Delete. This will permanently delete the object from your system, and all data stored within it will be lost.

Objects can only be deleted if they are not currently in use within the system. If an object you would like to delete is in use, a popup will notify you of any places where the system uses this object. There are three places where the object might be in use within the system:
- Fields: The object may be found in either the summary field or the lookup field of another object. In this case, the popup will display the field name followed by the object in which this field exists.
- Widgets: One of your dashboard widgets may display the object. In this case, the popup will display the widget name followed by the dashboard the widget is in.
- Automations: One of your automations may include a Create record action of the object type you would like to delete. In this case, the popup will display the name of the automation.
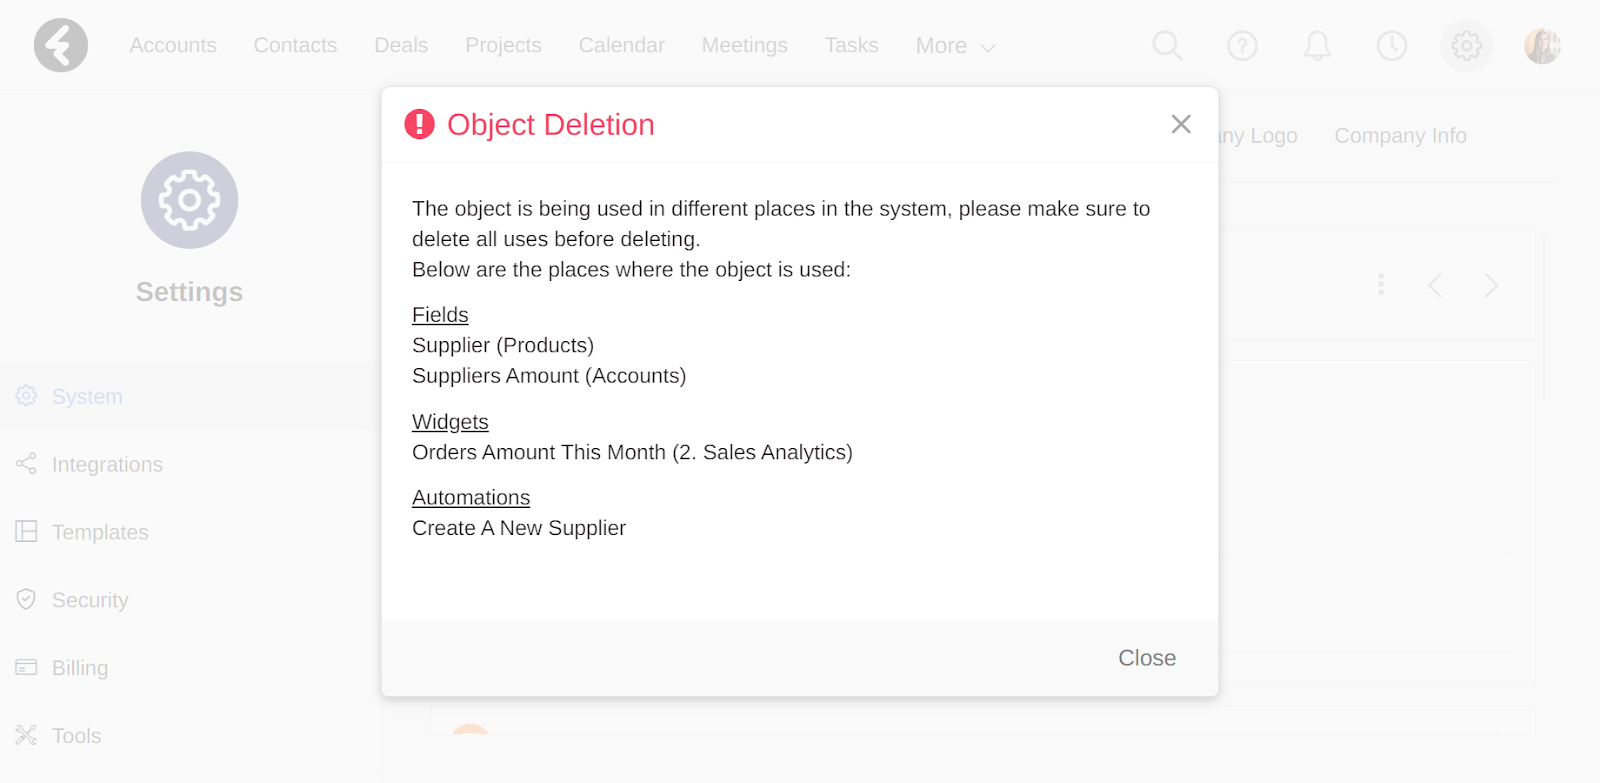
In order to delete an object, you’ll first need to remove all the places listed in the Object Deletion popup. Once all the dependent locations have been deleted, you can go back and delete your object.
Pages
The Pages option can be found under the form of each individual object’s page. Under Pages you’ll find a list view of all the pages which belong to this object. Click on any page to open its editor, or click the Add button to create a new page. In the next lesson you’ll learn about creating and managing multiple pages within an object.

Every object will have one page which is set as the default page, and will be used to display this object by default for any roles which are not assigned to a different page. You can use the Is Default column in the list view of pages to identify the default page. It will be set to True for the default page and be empty for the rest of the pages. You cannot change which page is the default page, and you cannot delete it.

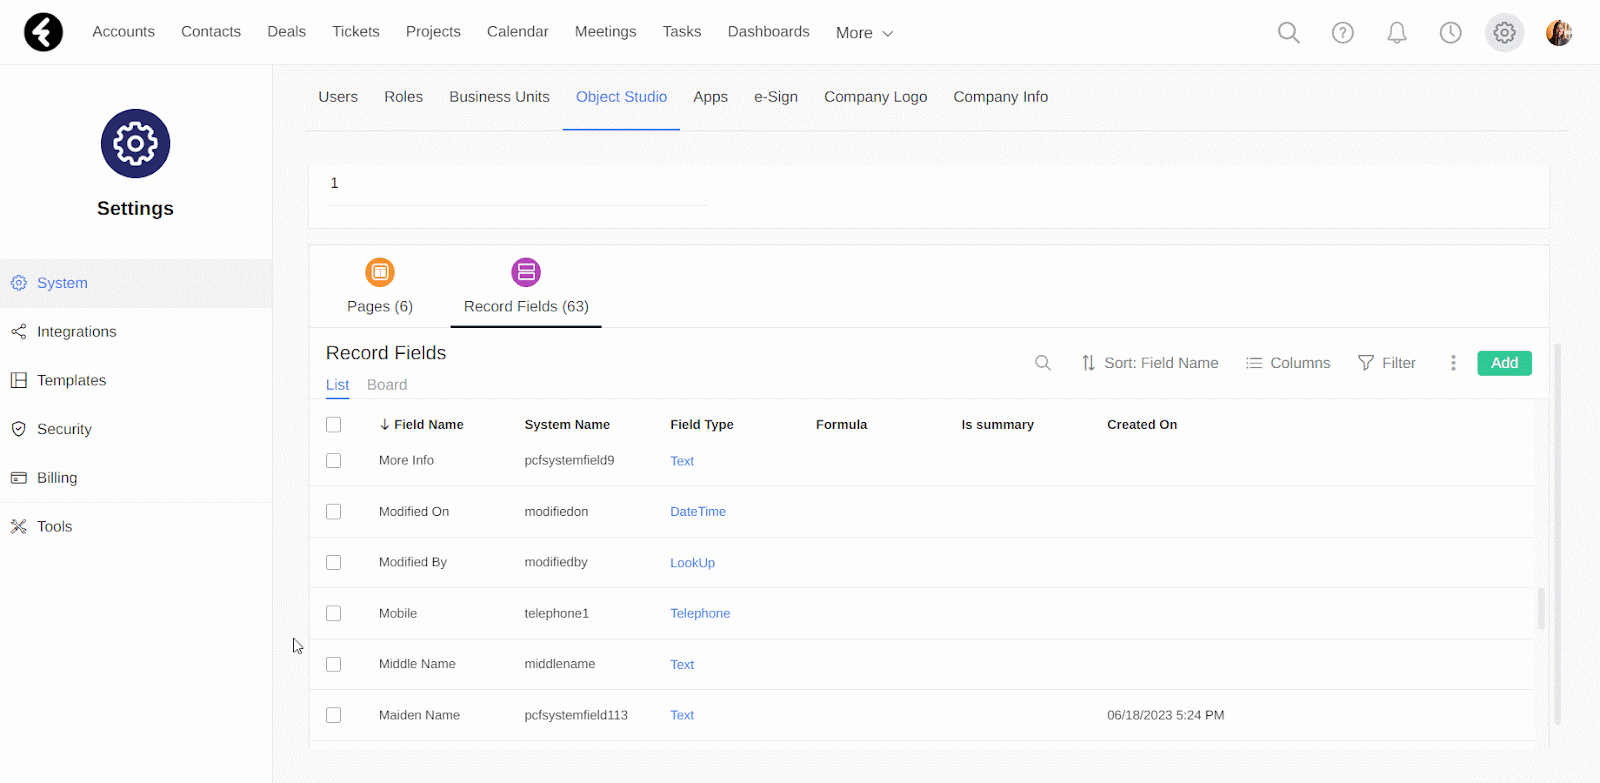
Record fields
You’ll find the Record Fields option to the right of the Pages option on each object’s individual page. By clicking this option, you’ll display a list view of all the current object’s fields. Here you can easily add new fields using the Add button, or edit existing fields by clicking on them to open their settings.

Deleting custom fields
You can choose to permanently delete custom fields, which will also erase all the data which exists within the field. You cannot bulk delete fields, rather they will need to be deleted one by one. A field must meet the following conditions in order to delete it:
- It’s a custom field, meaning it was created by a system user.
- The field isn't being used in a formula or summary field.
- The field isn’t being used in a view, either as one of the columns or in the filter.
- The field doesn’t appear in a widget of a dashboard as a field to show, sort by, or filter by.
- The field isn't being used in an automation.
- The field isn’t in the form component of any pages.
If a field meets all of the above conditions, you can delete it. To start, you’ll need to select it from the object page of the object the field belongs to. For example, if you’d like to delete the Maiden Name field in the accounts object, first open the accounts page from the object studio. Next scroll down to the Records Fields section and select the custom field you would like to delete by clicking the checkbox next to it. You can now click the Delete option. This will open a popup where you can type in DELETE and click the Delete button to permanently delete the selected field.
If the selected custom field does not meet the conditions above, clicking Delete will instead open a popup with a list of all the places where the field is being used within the system. To delete this field, you’ll first need to remove each use case. There are six places where a field might be in use. The popup will detail every place where the field is being used as follows:
- Formula fields: The name of the formula field and the object it’s in.
- Summary fields: The name of the summary field and the object it’s in.
- Views: The name of the view and the object it’s in.
- Dashboards, reports, or graphs: The name of the widget, the name of the dashboard, and the object it’s in.
- Automations: The name of the automation.
- Pages: The name of the page, and the object it’s in.
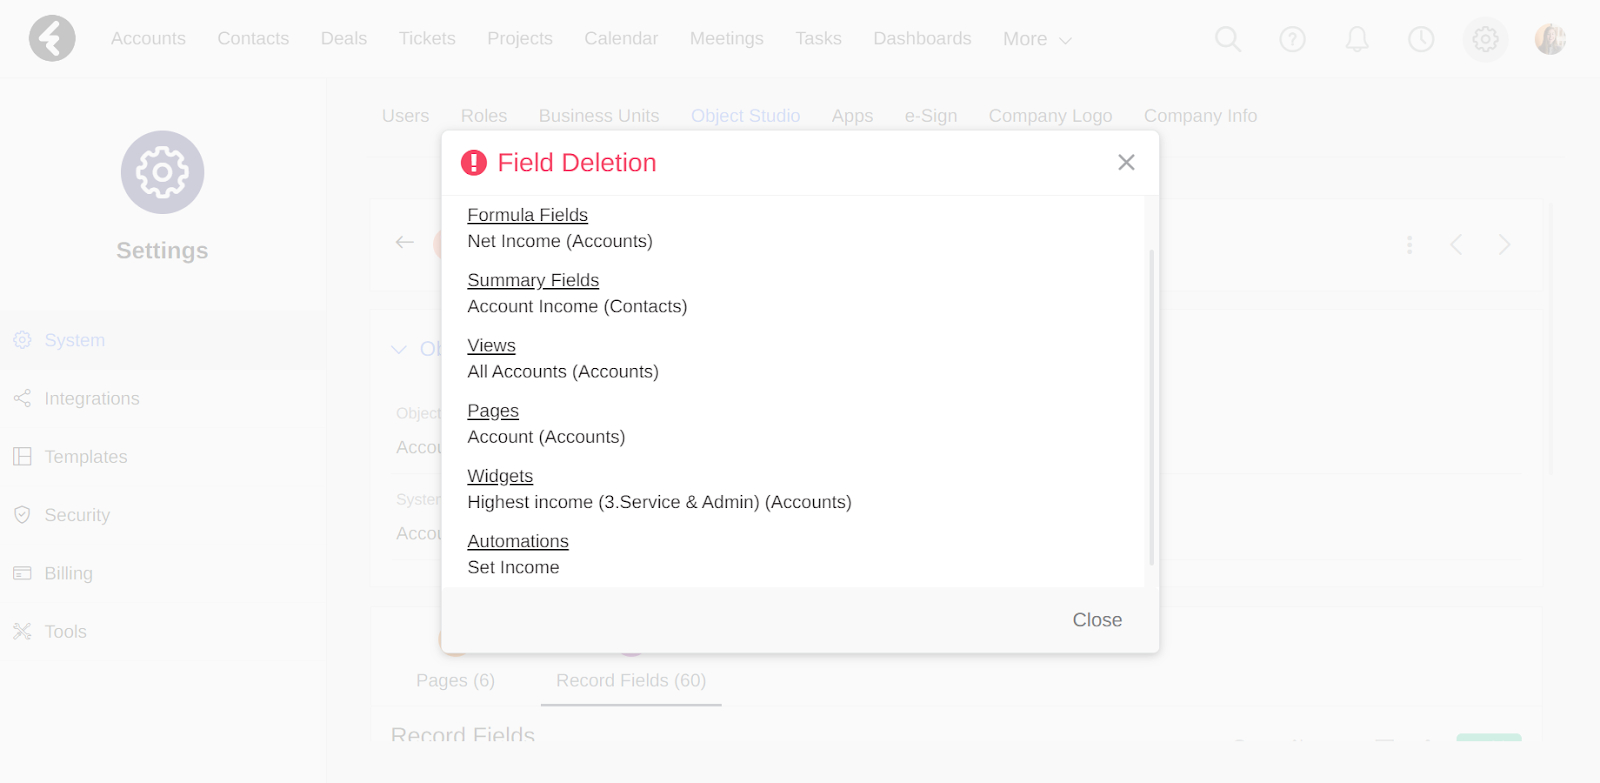
In order to delete the selected field, first delete all the use cases listed in the popup. You can then go back and delete the field.
In the next lesson you’ll learn how to add and manage multiple pages.
Work with the object studio to manage all your objects. You can edit existing objects or create new ones.
Course Lessons
Up next